8k Video Editing Pc Build 2021
Building my own editing PC was always something I thought was just a little but outside of my abilities, but I was wrong. I've always admired those who built their own workstation. I've never been a gamer, at least not since the Atari and ZX Spectrum days of the 1980s, so I'd never watched any of the thousands of YouTube videos on the subject. I badly needed a new machine – after only three and a half years (scary I know), it was starting to slow me down and I knew that technology had advanced quite a bit even in that short time. Even with trashing preferences and a complete reinstall of Windows and Premiere, I was seeing stability issues too, especially on larger projects. And because I work remotely, exporting videos to send to clients was a daily occurrence and something that took a lot longer than I wanted.
I'd never built a computer before and nor was I an expert by any means, so I spent quite a few months researching and watching endless YouTube videos and reading endless articles before taking the plunge. Happily, it all went to plan and was a lot of fun, so I hope this guide can help you, whether you are looking to do the build yourself or just trying to work out your specification which someone else will build for you.
To build or not to build
Off the bat, I should say that there is plenty that can go wrong if, like me, you don't really know what you're doing. I was lucky, but you might not be. You could buy incompatible parts or break something when putting it together or make bad choices when selecting components. On the other hand, we've never had it easier with the tools and tutorials available to demystify the process. And it wouldn't be any fun if there wasn't a bit of risk!
In this video from JayzTwoCents, he gives some pros and cons of building your own system:
5 reasons you should:
- It's easier than it's ever been
- It's cheaper than it's even been
- You have full control over the parts
- >It's a great learning experience
- You'll be better at fixing your PC
2 reasons you shouldn't:
- There's no third-party support or warranty
- It's hard to choose between all the options
I've heard it said that you can save money by building your own computer, but it's very marginal nowadays and only true if you don't count any of the time you put into the research and building phases. For me, it was more about having a hobby project and I loved it from start to finish. Honestly, I still have a bit of a warm glow when I look at my handiwork!
Quick start
If you don't particularly like doing loads of research, then the easiest thing is to find a trusted source and copy exactly what they have done. Matt Johnson is a filmmaker who has some great guides like this $750 build and links to $1500 and $2000 builds too, as well as a build guide.
Or this video from Marcus of PC Centric, which includes him putting it together too. As you can see, it does look remarkably easy!
Another thing you can do is look up popular custom editing system builders and see how they are putting together their machines.
Jumping in the deep end
However, if like me you love to do your own research, then here we go!
The first step I took was to go to pcpartpicker.com, register a free account, go to System Builder & start logging my planned components there.
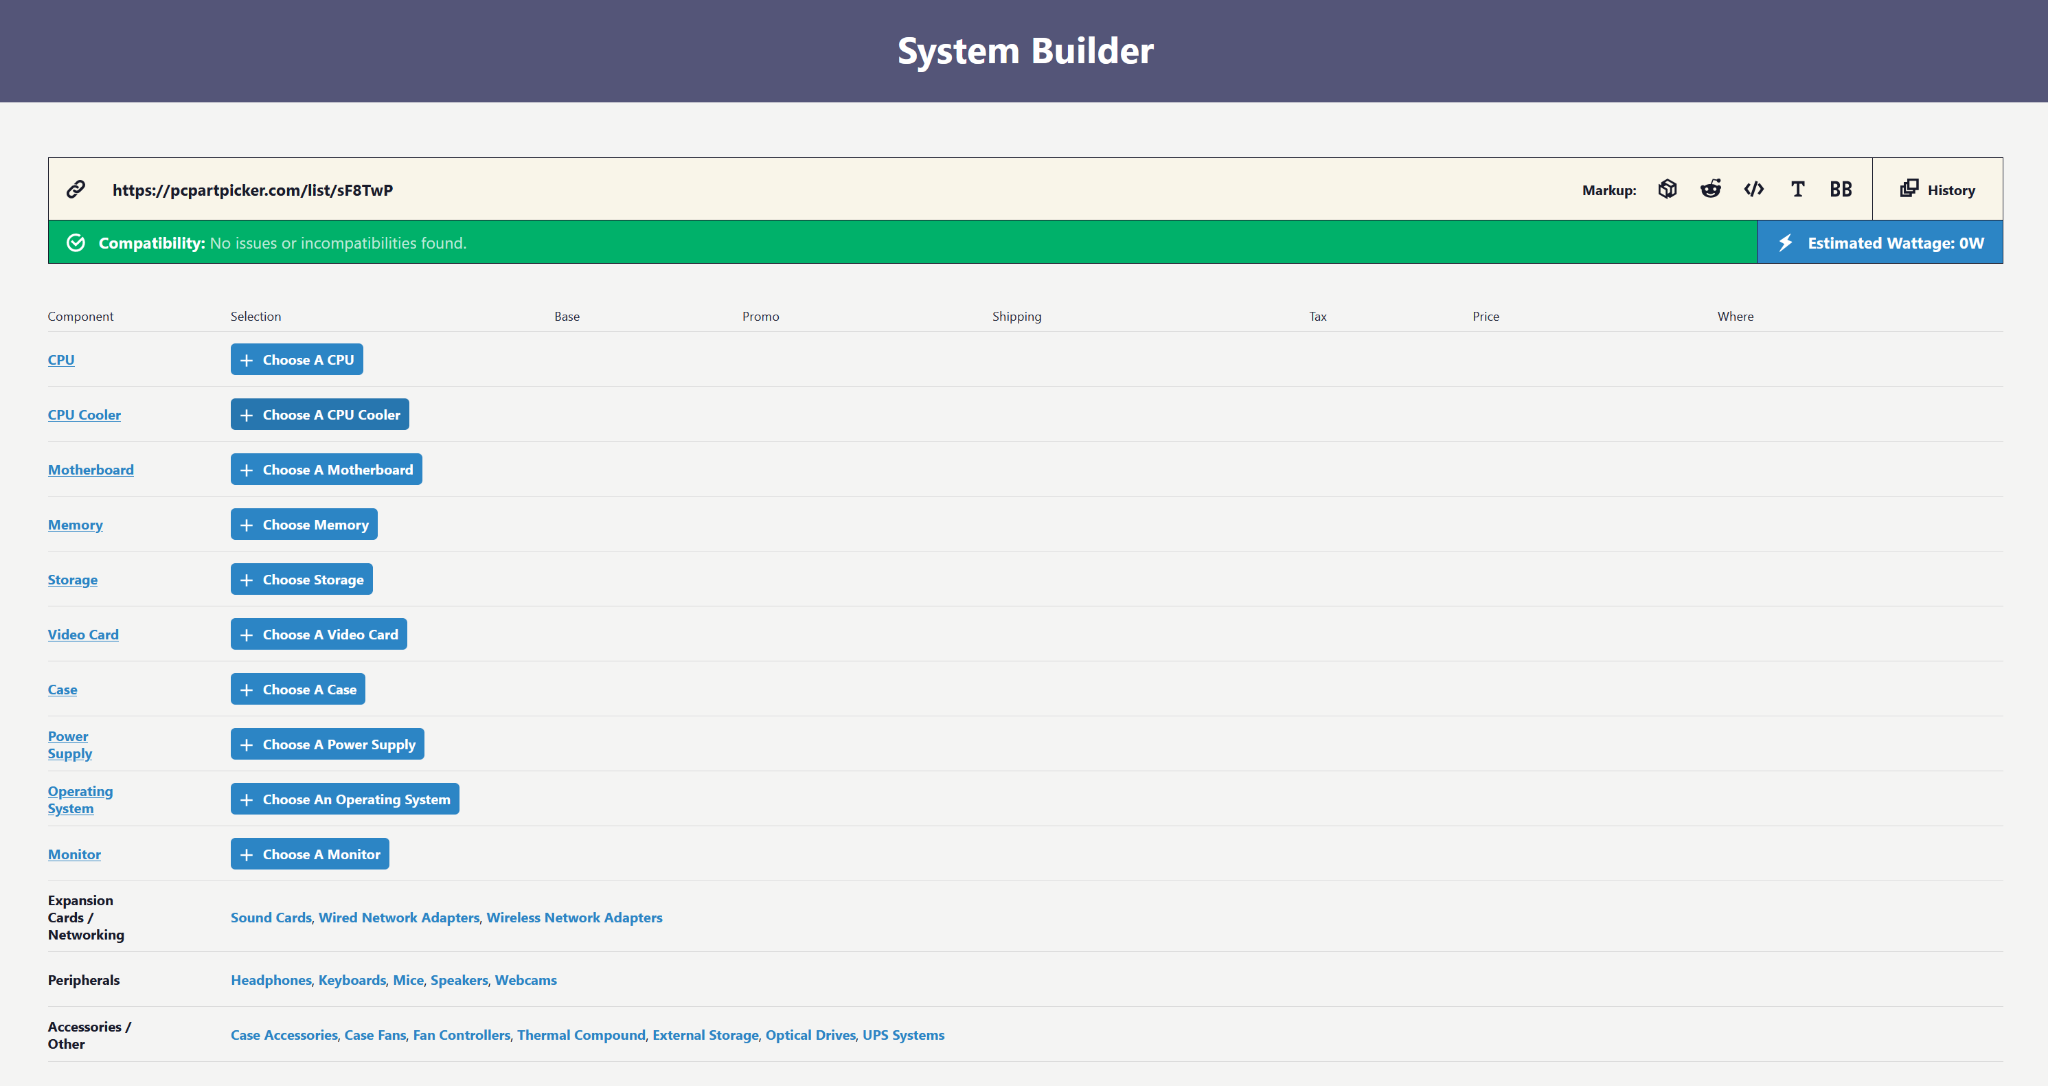
The site might look like it's only going to list your parts and keep track of the total cost which you could do yourself in Excel or Google Sheets, but it does so much more.
Firstly it walks you through the key components of your build:
- CPU (plus cooler)
- Motherboard
- Memory
- Storage
- GPU
- Case
- Power supply
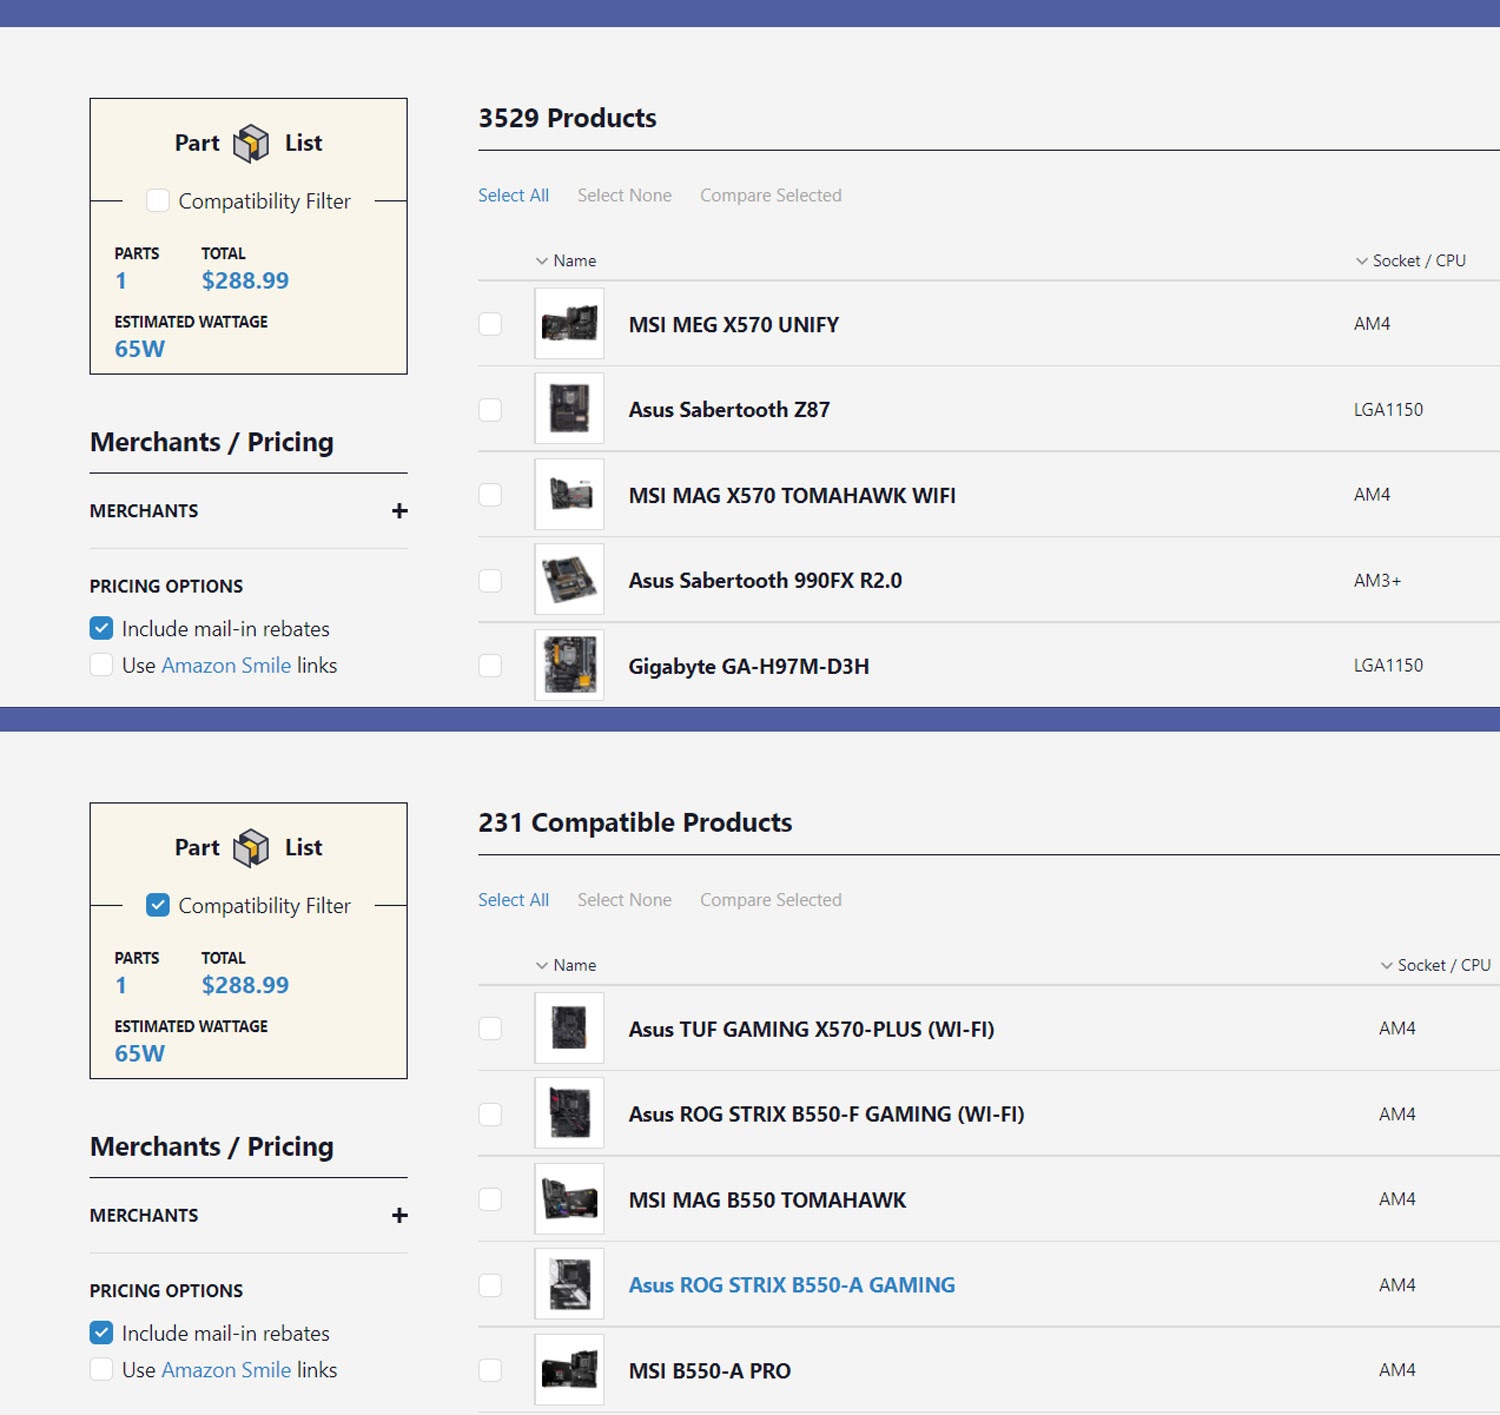
But more importantly, it has the power to cut out 90% of your potential mistakes off the bat with its built-in compatibility checker – it has a massive database of which parts go with which hidden under the hood. For example – does your power supply have the wattage it needs? – do you have the right chipset and socket for your CPU? – will your parts physically fit in the case? – and so on.
For example, if you choose the AMD Ryzen 5600X as the CPU, the Compatibility Filter shows only the motherboards that can take that processor which requires the AM4 socket.
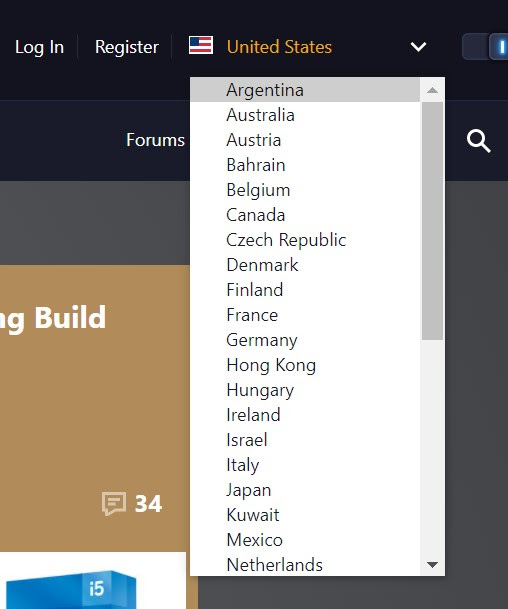
It also shops around for you automatically & supports around 40 countries. If your country isn't listed you will have to add your prices manually.
The CPU
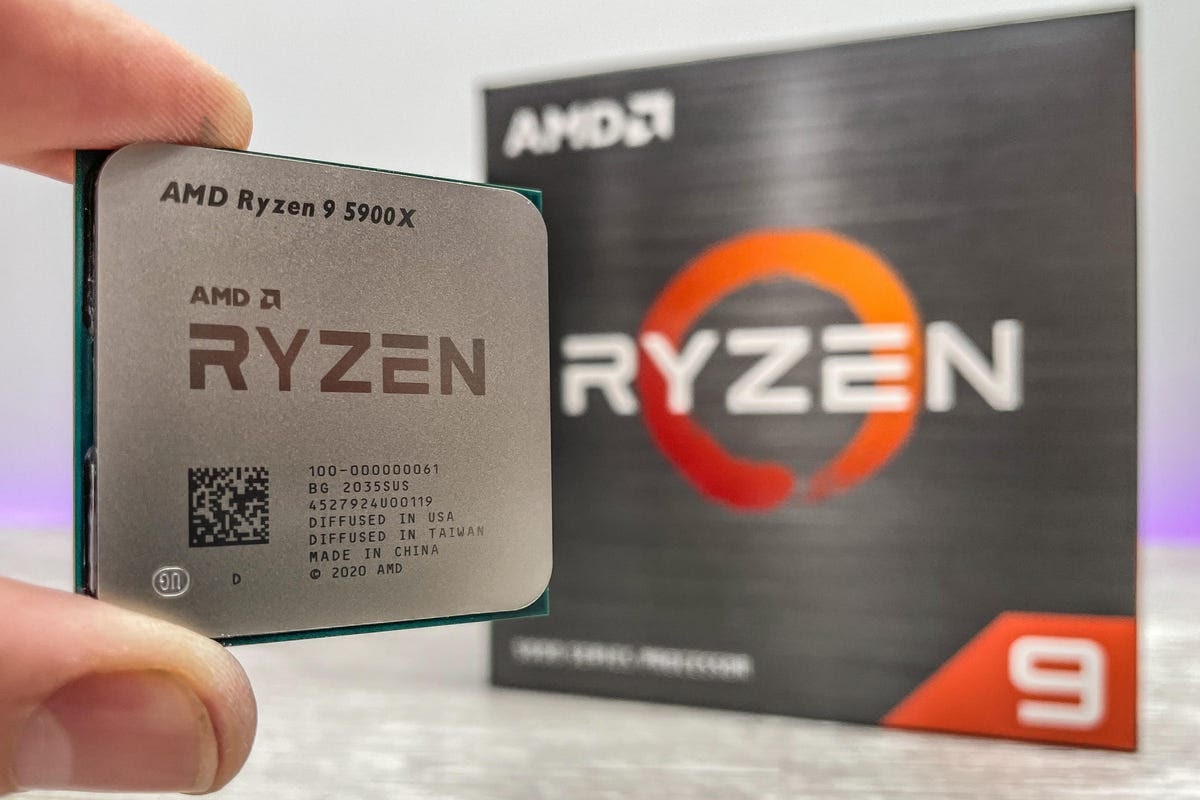
Most guides you will find start with the CPU ("the brains of the computer") and it is the best place to start planning your build.
There is so much tech under the hood that you can read about if you're interested. But at the end of the day, it's the day to day performance that counts. There are plenty of benchmark results around to help you see what you can expect from any CPU. There are synthetic benchmarks like Cinebench or Geekbench or plenty of gaming benchmarks where games are run head to head on different hardware. There are also interesting performance/cost charts like the cost scatter graph at CPU benchmark (the further a CPU is towards the bottom right, the more it is doing for the money – with a clear trend of AMD being the overall winner here.)
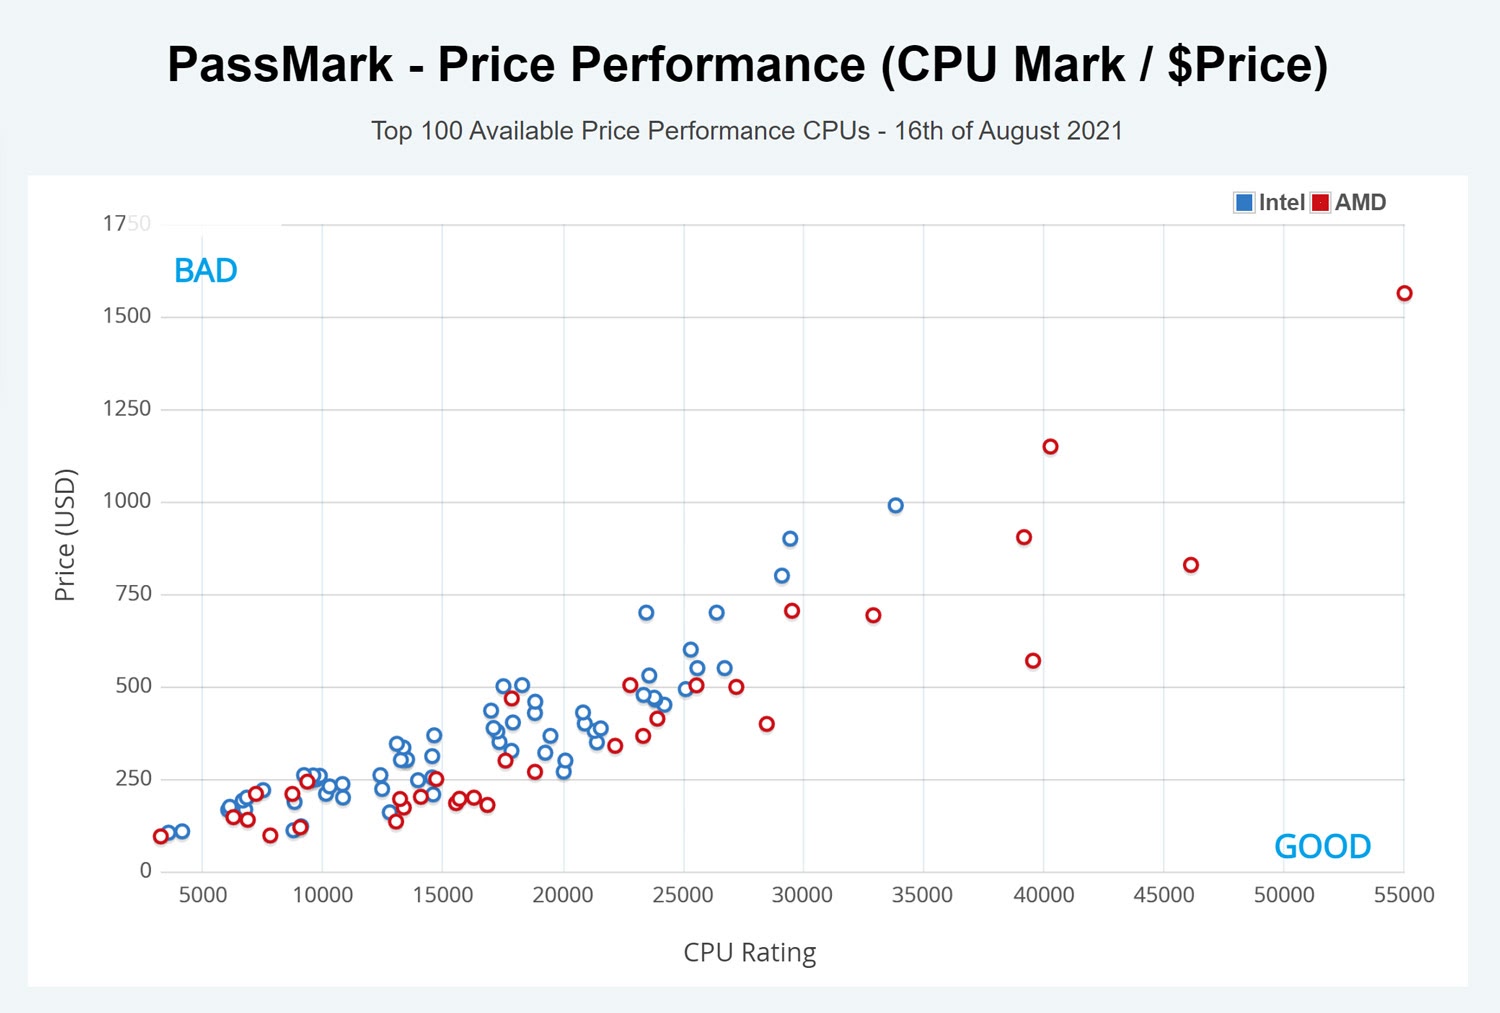
Incidentally, for those like me who haven't looked into all this for a minute, you might have a leftover idea from years back that Intel is more stable or safer somehow, but as I did my research I realized that this was old news and that AMD has taken a bit of a lead in recent years (plus the advantage of Intel's Quick Sync is largely gone now, except for a few very specific circumstances). I also remember the days when it was all about the clock speed going up every year, but nowadays it's the number of cores that distinguish the more expensive chips from their cheaper counterparts within a specific product line.
What I realized though, is that these types of benchmarks, while being a decent overall indicator of performance, are not directly related to my daily work, which is on Adobe Premiere Pro, with occasional use of Davinci Resolve. It was then that I discovered the treasure trove of research publicly available at Puget Systems, a custom computer builder based outside Seattle.
They have developed their own benchmark, PugetBench, which runs the software through some representative daily tasks – like playback, rendering and export – using H.264, H.265, ProRes and RED footage. You can run it yourself as well as search the database of user results. You can also look at the raw data on anything particularly important to you, like a specific codec or the time to do an H.264 export if you are doing that a lot like me.
Even better are the regular articles from Senior Puget labs technician Matt Bach, where he runs a test bench setup, running the benchmark on systems with only one component different each time, so as to see the difference that one component is making (here are up to date links for Premiere Pro and Davinci Resolve). Their hardware recommendations are excellent too (Premiere Pro, Davinci Resolve) and easier to understand.
For example, in this Intel 11th Gen vs AMD Ryzen 5000 article for Premiere Pro, each CPU battles against the others under identical conditions (same GPU, same RAM, etc.). Even if you look no further than the overall scores, these results are so much better than any other benchmarks, as they are specific to your daily workflow.
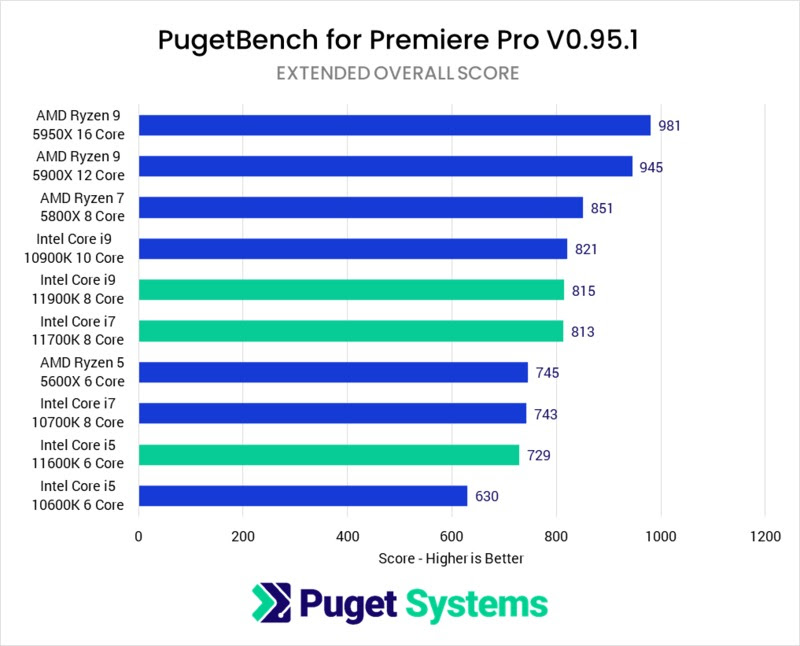
I find it useful to calculate the price/performance from these results which helps you weed out the under-performing CPUs. Doing this shows that in the sub $300 bracket, the Intel Core i5 11600K is excellent value, closely followed by the AMD Ryzen 5 5600X. In the sub $500 range,he Intel Core i7 11700K and AMD Ryzen 7 5800X are both good options and then above that the AMD Ryzen 9 5900X has most of the performance of its older sibling for a much lower cost. You also see that the more you spend, the less you get for the money – the performance per dollar drops sharply as you move up the chart.
If you want more performance and have the budget to match, there's AMD's Threadripper and Threadripper Pro series and Intel's Core X-series and Xeon series. At this level, AMD has a significant lead – the now quite dated Core X-series has been overtaken even by the Ryzen 5000 series and the Xeons are edged out by Threadripper Pro.
Budget vs Performance
I didn't have a fixed budget starting out. I knew that my last machine had cost around $1400 and that I wanted to spend quite a bit more this time around, seeing as I am using it all day, five days a week (and knowing it was tax-deductible!).
I started off by focusing on value, but after a while, I started to think about it differently. I would be paying for this machine once and using it every weekday, most weeks of the year, for a number of years. Let's say it lasts me 4 years, then I will use it for around 1000 days. That made me want to spend more and get something pretty powerful.
That said, here is where I probably made my first big mistake. Once I'd come across the AMD Threadripper series, I just fell for the name! I saw their chart topping scores and high core count and started to talk myself into needing one. To be fair, at the time of my research, the AMD Ryzen 5000 series wasn't available yet and the Threadrippers had a pretty decent lead on the previous generation and the Intel chips, especially when it came to exporting. The first of the series – the 24 core 3960X – was just about in my budget and so I decided to build my system around that.
How long to wait?
A question that keeps any computer builder up at night is, "Do I wait for the next big thing?". This only gets worse when you are investing a lot of hard-earned cash into something that's going to be important to you.
I think the absolute rule here is that if you need a computer, you have to get on with it. Otherwise, you could be waiting forever as there's always one more thing just round the corner.
That said, it can pay to watch the trends, particularly of CPUs and GPUs – here is a really useful tracker. If you can easily wait for the next-gen then it can be worth it. For example, as I write, the 12th gen Intel chips are due out soon and the rumours are looking strong – I'm keen to see how these chips perform and whether Windows 11 will make a difference which some predict. The next-gen Threadrippers are also due before the end of the year.
Motherboard & Cooler
Now that you've chosen your CPU, choosing a motherboard is much easier. The socket that your processor fits into and the chipset on the board have to match and consensus from reviewers will narrow down the options to around ten or so.
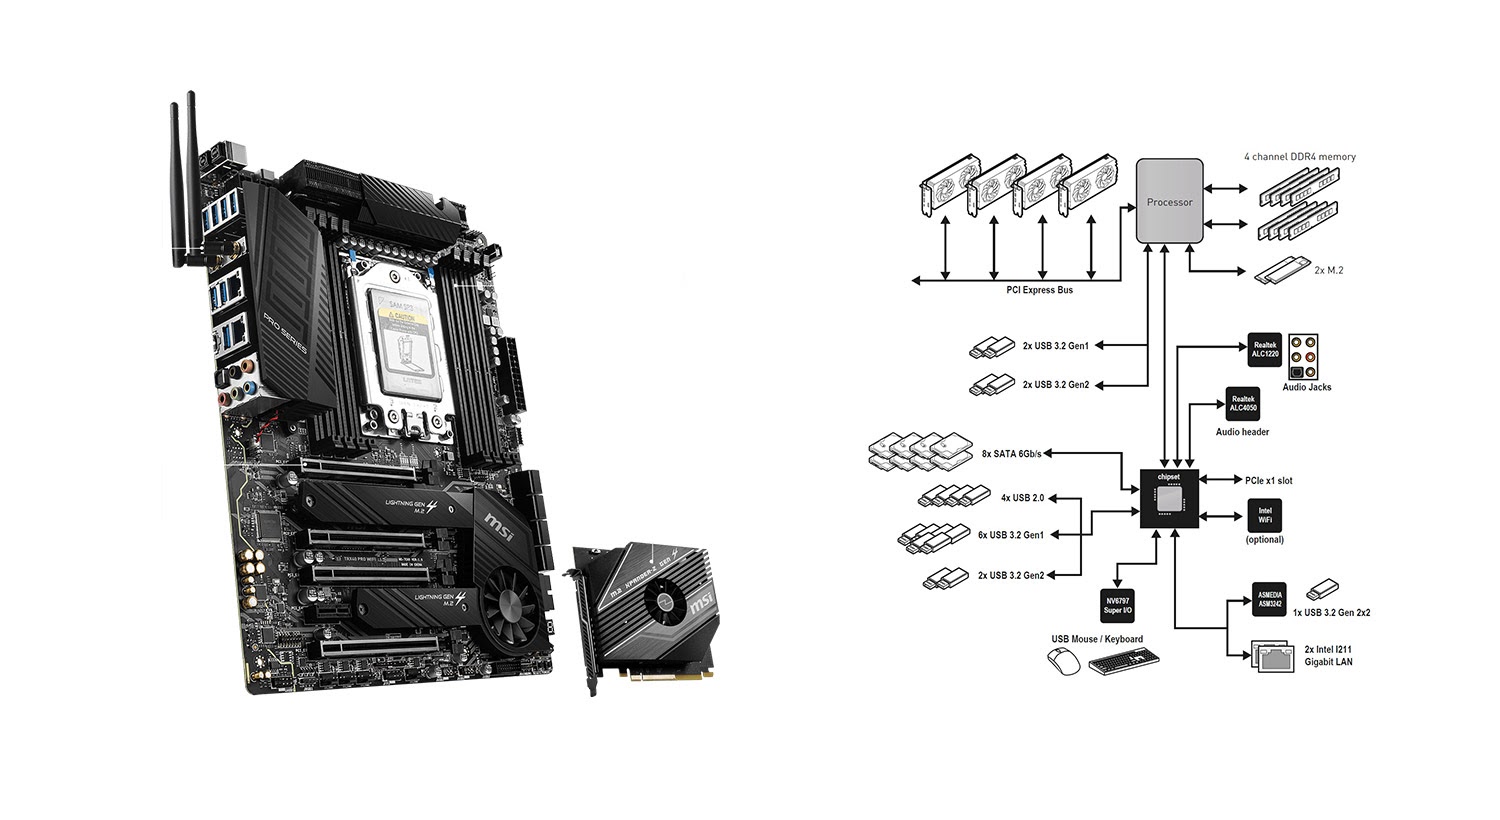
You can look up videos and reviews on "Best motherboard for [your CPU]" – my main source was Gamers Nexus (a guest review from the wonderfully geeky Buildzoid). I decided how many USB ports, ethernet ports & M.2 slots I needed, whether I needed built-in WIFI and whether I liked the layout of the BIOS & settled on the TRX40 PRO WIFI from MSI (review videos will talk you through these details if you're not familiar).
For the cooler, I did slip down the rabbit hole of custom water cooling briefly but played it safe with one of the industry-leading Noctua models that fit my CPU (the Noctua NH-U14S TR4-SP3), which runs near silent unless I'm exporting.
Memory
The system requirements for Premiere recommend 32GB RAM, but I had been working with 32GB for a few years and often seen it max out while monitoring Task Manager. Sometimes Premiere just needs a lot of RAM! I decided on 128GB RAM, which is perhaps overkill, though it is recommended by Puget for 6K/8K.
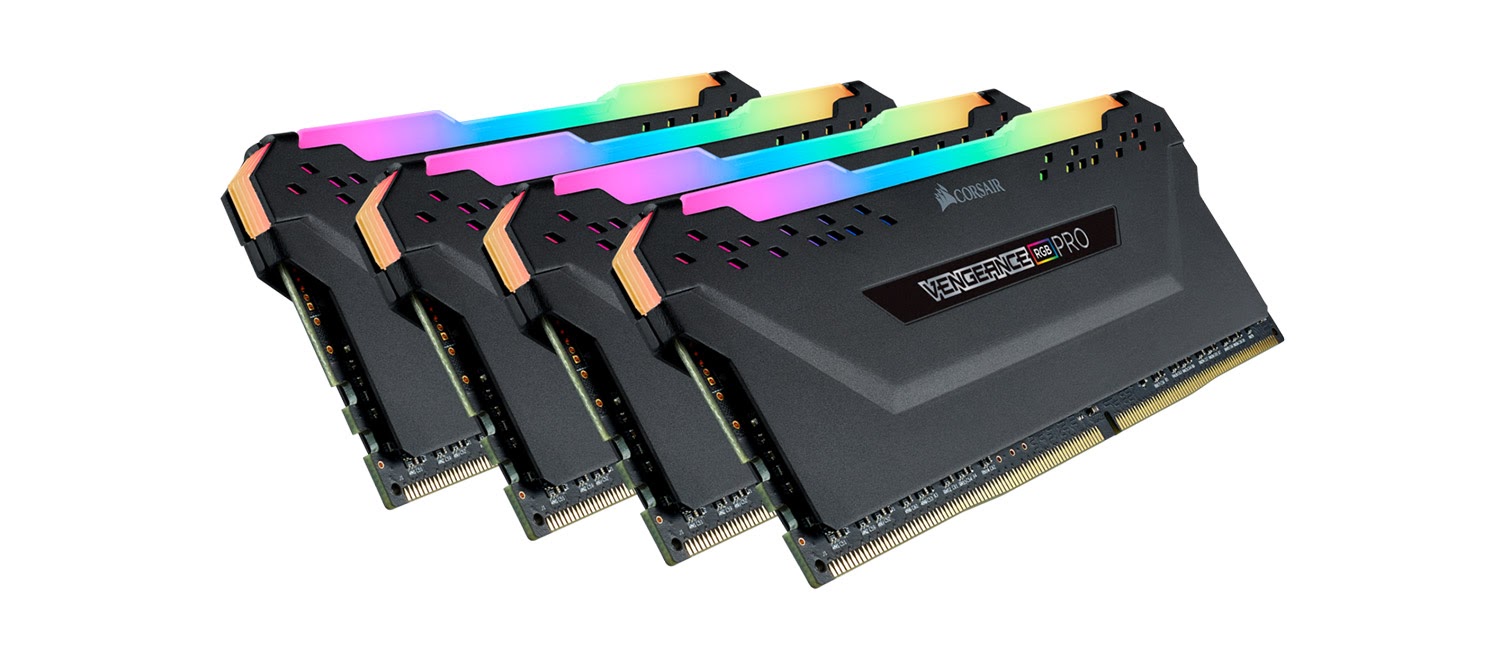
It seems like aside from the amount of RAM, the other options, like DDR4 vs DDR5 or RAM speed, don't affect Premiere that much. Most people were recommending either CL16 3200 MHZ or CL18 3600 MHz RAM and it seemed like the difference between them was subtle. Any other RAM was a lot more expensive for very little improvement. You also need to decide if you want RGB RAM or not (i.e. whether it lights up in pretty colors!) I chose the Corsair Vengeance RGB Pro 128 GB DDR4-3600 CL18.
Storage
Premiere works best if you have one drive solely for Windows and Programs and a second drive dedicated to the cache. Storage for your rushes is often on external drives, but I decided to fill up my available slots with SSDs for smaller projects.
I was excited to get my first NVMe M.2 SSDs for this, which are much faster. I looked up a lot of reviews and benchmarks (e.g. Trusted Reviews) and settled on a couple of Samsung 970 Evo's, saving some money by sticking with Gen3 over the slightly faster Gen4, which again doesn't seem to make that much difference. I also got some cheaper Crucial MX500 SSDs for file storage and some ADATA XPG SX8200's for media. I have noticed that opening up and working with larger Premiere projects has transformed since I've been working off NVMe drives.
Video Card
If you've tried to buy a video card in the last year, you will know about the GPU stock shortage. Between a ramp-up in demand from gamers, Covid causing manufacturing delays, demand from crypto miners and scalpers making things even worse, prices are still well over MSRP – if you can even find cards at all. In the U.S. there is even an anti-mining bill in process. It's also interesting that Intel has announced their entry into this market for 2022.
The GPU is probably the second most important piece of hardware you will choose and perhaps the most important if using Davinci Resolve. Puget analysis shows the Nvidia RTX cards perform better than AMD's (especially when price is taken into account and even more so if you focus on export) and research from YouTuber EposVox has shown the hardware H.264 encoding (which is the default export from Premiere) is better quality on Nvidia. For me, it was clear that I wanted an Nvidia card. The only problem is finding one! This alone might be why you go with a custom builder like Puget if they have managed to find stock.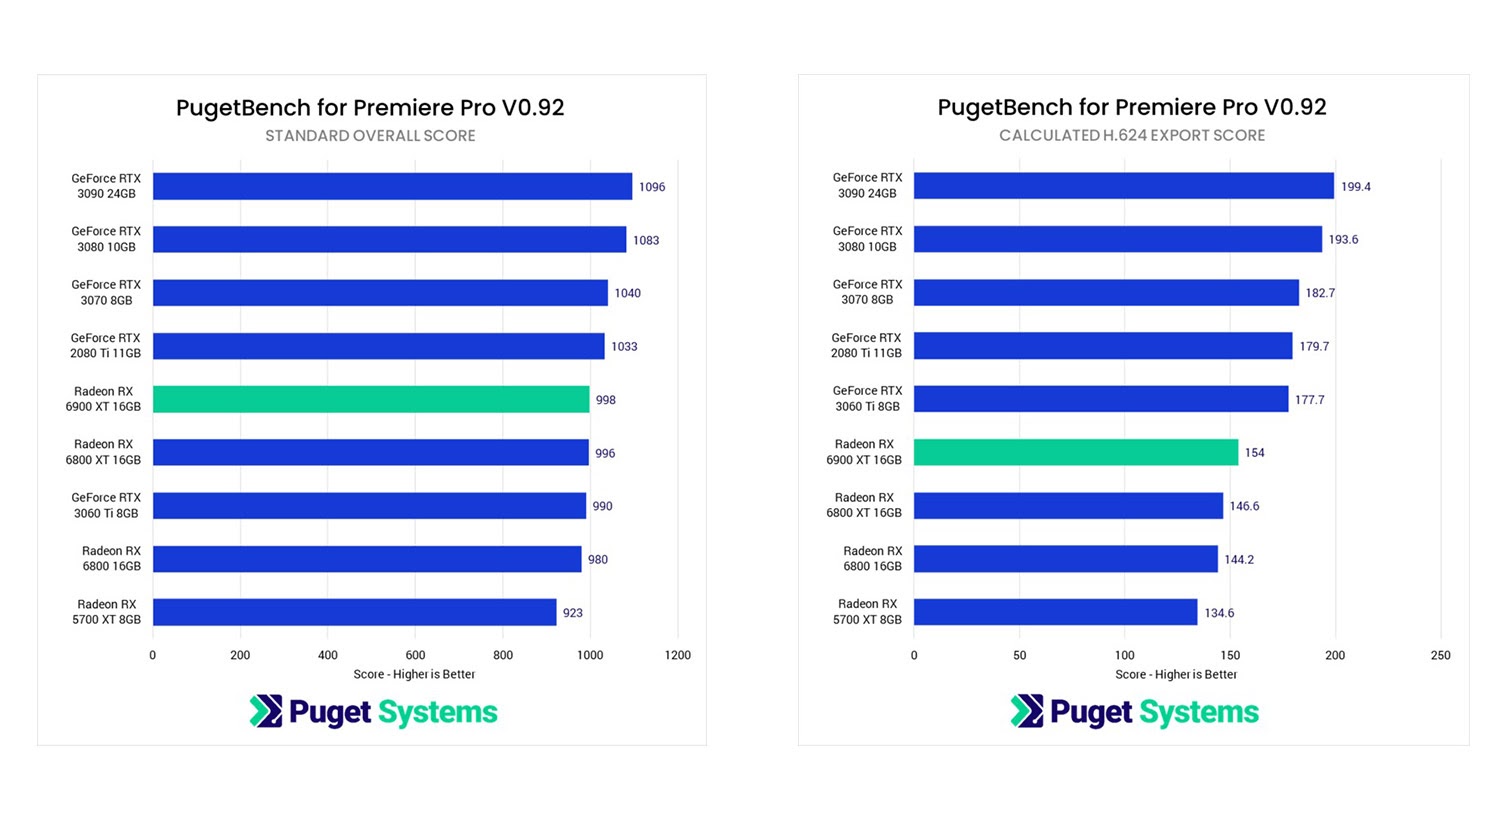
This is one area where you can save on budget as the lower models like the 3060 or 3070 have most of the performance of the higher models, with the exception of very GPU intensive operations like noise reduction (Colorists will sometimes have two or three cards in their workstation).
It's important though to know what resolutions you will be working with and get enough VRAM. You'll find that cards are mainly built and sold by third party companies like EVGA and Gigabyte. I wouldn't worry too much about who you get your card from, just read the reviews for the card in question.
As the Nvidia 3000 series was only just starting to come out and I had heard about the shortages, I opted for the RTX 2060 Super. This is also the type of card that keen gamers are getting rid of to stay up to date, though the situation is so bad that one or even two generations behind are still in high demand.
Since moving from my old AMD RX480 to the NVIDIA RTX 2060 Super, I have noticed a giant increase in both speed and quality for my H.264 exports and it has made a big difference in my daily workflow.
Case
Gamers Nexus was again my main guide for a case & I wanted something with good airflow that could run really quiet on idle, as well as look good. They really recommend mesh-fronted airflow cases, so I chose the Phanteks Eclipse P500A D-RGB.
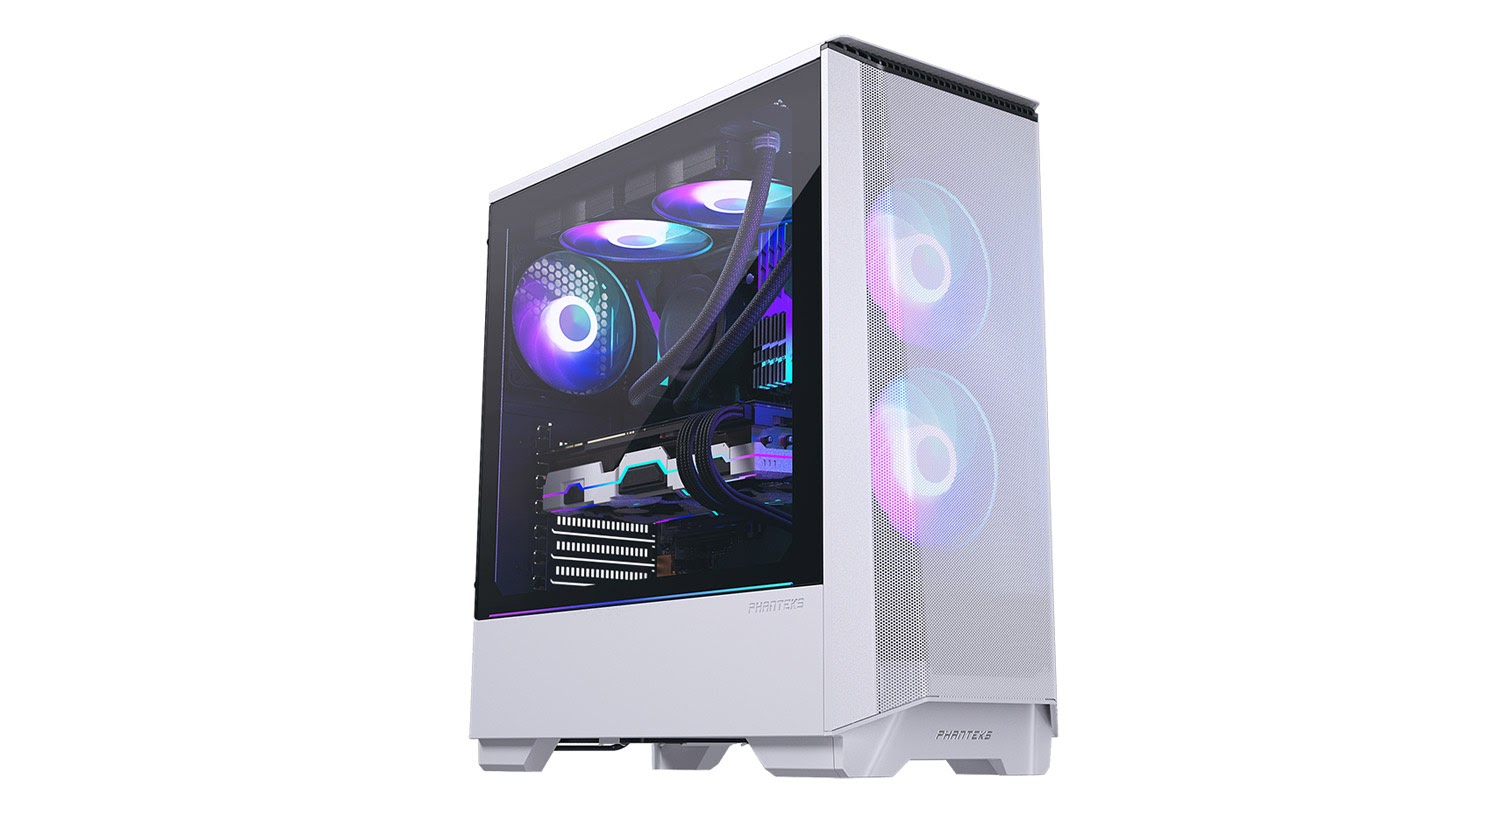
I also decided to buy some affordable but well-reviewed Arctic F14 PWM fans (PWM fans have more control over speed in the BIOS), due to my aim of a quiet running PC and to dial down the RGB a little!
Power Supply
By this stage, PC Part Picker had given me a good estimation of the wattage required being 726W, so with a bit of leeway, I was aiming for a 850W unit. When I was buying there was a bit of a shortage of PSUs and I found a good deal on a Super Flower Leadex Platinum 1000 W unit, which also got great reviews. The main thing is that the wattage is enough – it doesn't matter if it has more capacity than you need as long as the price is right. Platinum here is a measure of efficiency, meaning it wastes less electricity, but I don't think that's that important in the decision making process if you want to save some money with a lower efficiency like Gold, Silver or Bronze.
The actual Build
Having completed my parts list, I watched plenty of build videos while I waited until all the parts arrived. I also watched specific guides on my CPU and cooler installation, as well as people working with my case. You don't want to start building before you know everything you need to know.
Cable management is an art form in itself and makes a big difference to how you feel about the end result, so it's worth watching a few videos on that alone.
Everything went to plan for me, though I must admit there were a few moments when I got a little stuck. I had also watched a few what not to do videos which helped.
A lot of guides will point you towards getting quite a lot of kit, but honestly I mainly used just one screwdriver & some needle nose pliers for the cable ties. I did treat myself to the iFixit kit featured in this video – mainly because I really liked the look of it and I have used it many times around the house since then.
Conclusion
I cannot tell you how much my day-to-day experience in the cutting room has changed since building my new PC. In terms of metrics, I went from a PugetBench score of 270 to over 1000 and I can see the difference it has made to stability, performance and export times.
Even though I probably spent a bit more than I should have & not every core is used to its full potential, my exports are over 4 times quicker, Premiere is rock solid and I feel like I achieved something that I'd always wanted to. It can also handle all the file types that I throw at it, if at a pinch I don't have time to make proxies (though I still do as even with this good a machine, proxies make such a difference in responsiveness).
There are risks to building your own editing workstation. If you are on mission-critical work then I would say you need solid support and probably have to choose a trusted supplier. But I would heartily recommend it to anyone who has a decent level of computer knowledge or is prepared to put in the time to learn.
_____
Additional links
Beginner channels
- Linus Tech Tips
- Paul's hardware
- Joey Delgado
- JayzTwoCents
- Bitwit
- PC Centric
Regular updates channels
- Gamer Meld
- Graphically Challenged
- RedGamingTech
- Level1Techs
Hardware review channels
- Gamers Nexus
- Hardware Canucks
- Hardware Unboxed
- Actually Hardcore Overclocking
- Hardware Scientist
- TechteamGB
Hardware review sites
- https://videocardz.com/
- https://www.techpowerup.com/
- https://www.guru3d.com/
- https://www.kitguru.net/
- https://www.tomshardware.com/
- https://www.anandtech.com/
Forums
- https://www.reddit.com/r/buildapc
- https://pcpartpicker.com/forums/
Alternative parts lists
- https://builds.gg/
- https://www.newegg.com/tools/custom-pc-builder
Alternative benchmark for big companies (results not public)
- https://benchmarks.ul.com/procyon/video-editing-benchmark
8k Video Editing Pc Build 2021
Source: https://www.provideocoalition.com/building-your-own-editing-pc-a-complete-guide/
Posted by: murraybehere.blogspot.com

0 Response to "8k Video Editing Pc Build 2021"
Post a Comment